Start Art Journaling!
 With this post, I want to introduce more people to art journaling. I will create this art journal page step by step using a simple concept and few basic supplies. You only need watercolors, colored pencils, and a thin black marker pen.
I have created this page on a Moleskine notebook (size: 5 x 8 1/4 inches, 13 x 21 cm). Your journal can be larger or smaller. This page is created on the actual page of a journal. But you can also use a separate paper and attach it later, so you do not even need a journal to get started!
Journals
You can make an art journal from almost any notebook or old book. You can also bind one yourself. If you paint on the pages, thick pages are better than thin ones. For watercolors, absorbent paper is better than waxy one. But if you use water sparingly, even pages with a waxy surface can handle some watercolor.

I am currently working on three various sized journals. In addition to the Moleskine notebook, I have a black Smash book and a Dylusions journal. The paper in Moleskine notebooks is less absorbent than in the other two, but it still works with watercolors.
General Inspiration
An art journal can consist of any visual material. You can create a collage of cut-out images or printed photos. Or you can paint or draw, or do it all! The pages often have some writing too. You can cut words from magazines, write them on a computer and print them or journal by hand. As art journaling is a form of self-expression, I think that pages are at their best when you create everything by hand.
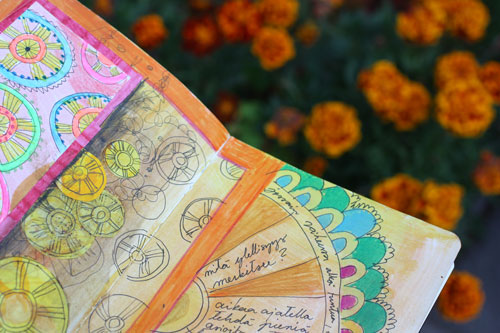
I do not believe in waiting for the inspiration. Once I have made the page, I usually realize what things have affected on it. Like when walking in the garden, I realized that my marigolds had had something to do with the page! So, do not wait until you have something to say or draw, just start creating! With these step by step instructions, you do not need a single idea before you begin!
Step by Step Tutorial for an Art Journal Page
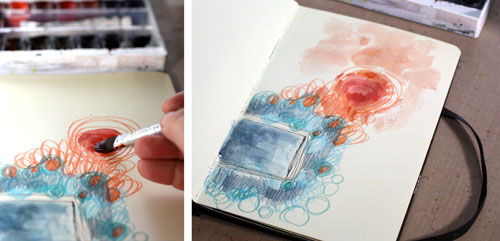
1) Choose the page and draw the first shape
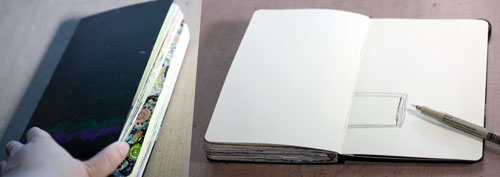
When I begin an art journal page, I usually feel quite stiff. The routines of everyday life can block our creativity. So it is no wonder that when you hold that brand new journal, you feel intimidated to start. Pick the page randomly as the first pages are the most usual causes of the blank page syndrome. Then take your thin marker and begin to draw. Slowly. Then a bit faster.
My imagination at this point was close to zero. I drew a rectangular and was able to mess it up so that I needed many lines to hide those clumsy strokes. Now I could have easily given up, no inspiration, nothing, just ruined one perfect blank page. But I knew better and went on.
2) Paint the shape with watercolors

To get my creativity flowing, change the marker to the watercolors. Constant interruptions are something that our rational side hates. That’s why it is important to be impatient, work quickly and continuously change the way of working. Paint the shape with watercolors and do not care how ugly it looks!
Painting the square did not make me feel especially creative. And with all the color choices I had, I chose a very conservative blue. Some would say that all the hope is lost, but I promised myself to continue to the next step.
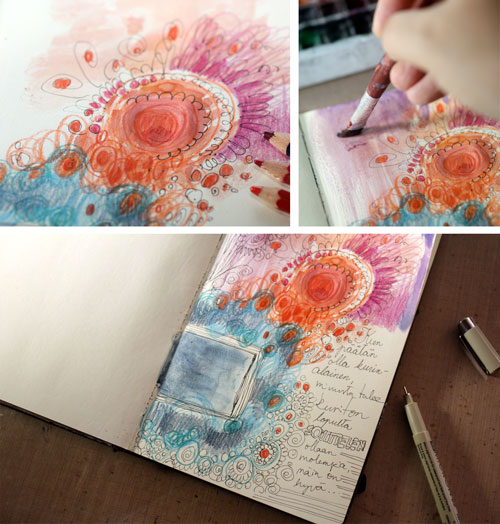
3) Doodle around with colored pencils and finish with a large shape
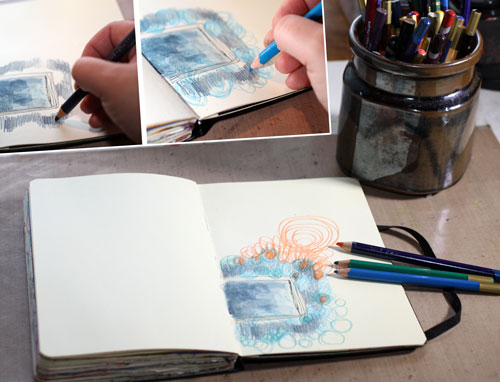
Start doodling with colored pencils. Believe me; you want to stay focused and work close to the shape. The rational thing to do would be doodling all over. Just stick to the area around the shape!
At this stage, I began to feel a bit anxious. It would have been so much fun to fill the page. But I followed my rules and remembered to change the color so that the process of coloring got interrupted. You can see that I began very traditionally, just with strokes. Then I changed the color and moved to drawing circles. After that, I picked another pencil and colored the circles.
The whole process so far has been pretty dull: First a square, then strokes, then circles. I felt a bit sarcastic at the moment: “What next? Triangles?” You can choose your doodles freely but end this phase with a bold movement: draw a large shape. Then abandon the colored pencils for a while.
4) Paint a new large shape with watercolors
Watercolor the large shape drawn in the previous step. Then clean your brush by dragging it around the shape.
You can see that when choosing the colors, I did not repeatedly use the same colors so that they would have spread evenly. Instead of that, I created two color areas: blue and orange. They both contain various hues of color. The blue area varies from gray-blue to blue-green, and the orange area includes warm red. This way there are two elements on the page: blue rectangle and orange circle.
They say in poetry: two is a conversation. Even at this early point, the page looks like an image. It makes you think: who are they?
5) Doodle with the marker

Fuzzy watercolors and soft color drawings look beautiful when they are partnered with a thin marker. Like in photos where something is blurry, and something is sharp, your page will look more appealing when you create the same effects.
Doodle around and over the shapes that you created in the previous steps. Don’t be afraid of crossing the shapes. In art journaling, a lot of time and energy can be spent in layering, but it requires nothing more than drawing over something beautiful to create even more beauty!
6), 7), 8) Colored pencils, watercolors, doodling
At this point of repetition, I began to feel pretty inspired. After coloring some doodles with colored pencils and painting some blank areas with watercolors, I felt inspired enough to write something that I thought that I am experiencing. I wrote: “When I decide that I have to be under control, I will be out of control. Then I make an agreement with myself: let’s be both!”
9), 10), 11) Watercolors, colored pencils, doodling
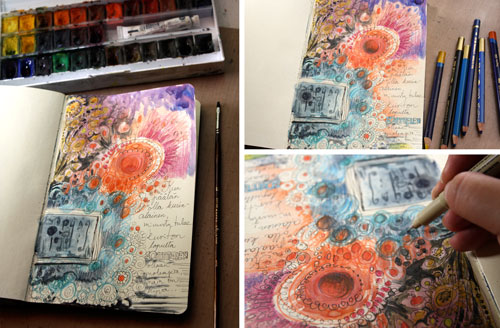
Now we are in the final round of making the page. Because these are the steps where you fine-tune your artwork, use a thin brush and very little water with watercolors. When adding details with the marker, change the orientation of the work once in a while. Many times it is easier to focus on the details if you turn the page upside down.
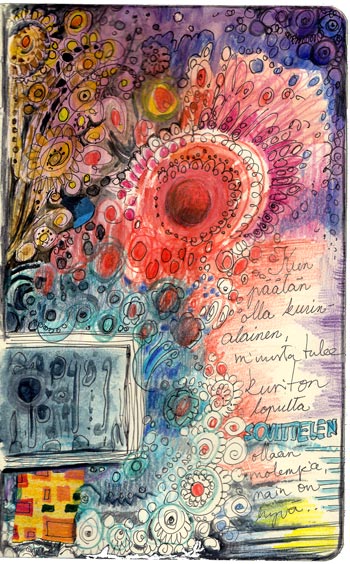
In poetry, they say that if two is a conversation, then three is a dance. I emphasized the upper left area to create a third element. It made the page more dynamic. Namely, at that point, I was feeling super dynamic and inspired!
12) Finished?
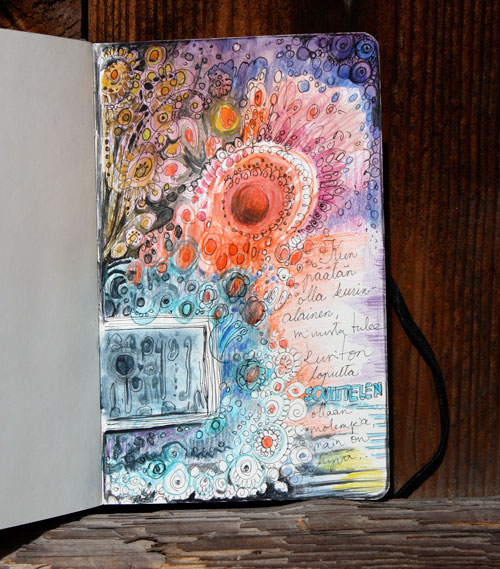
When you assume that your page is finished, it is time to take a pause and examine the work.
When I examined mine, I saw that my rational side is there in the form of a computer screen and my creative side in the form of an orange flower. I decided to add a little hand decorated paper piece under the computer screen to make it look more like a computer. Then I added another tiny blue piece besides the orange flower to make the orange pop.
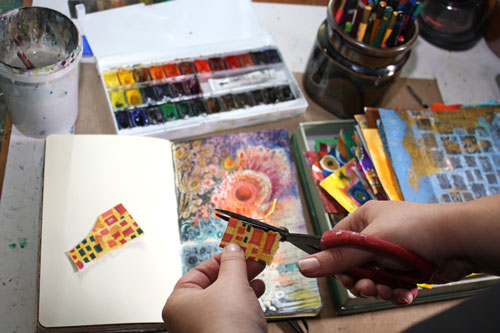
When you use your own hand drawn papers for collage, they will integrate beautifully. (New to hand decorated papers? See the basic instructions.)

The finished piece now expresses my love for the internet and computers. If that subject was given to me at the beginning, would you think that I could have created that image? Never! I would have stared the blank page and after a while, be as bored as my beagle is at the moment! Getting started even if you don’t feel like to and still finding the happiness of self-expression along the way – that is the magic of art journaling!
Let me be your art teacher: Subscribe to my weekly emails!
34 thoughts on “Start Art Journaling!”
Comments are closed.
Great post! I like your advice about not just waiting for inspiration to strike, but to just start making something. I sometimes get my best ideas when I start experimenting.
Thanks, Elise! I feel the same: best ideas come often by surprise!
Your process is amazing!! I love that you showed inspiration may not strike immediately, but how to push through it until you are inspired. So many great tips and the page is gorgeous! Thank you!
Thanks, Jen!
i LOVE this post Pavi!!! great ideas-great inspiration-great page! thank you for sharing some tips with us. it looks like you used a Micron pen…is that a good one to use with watercolors…? do you ever use/like faber castell pitt pens? i love how you keep things simple, and yet the finished piece has so much depth-so much to enjoy. you are a treasure 🙂 so happy i found you!
Thank you, Jenny! Yes, in this post I used Micron pen, but any thin tipped marker will do. With watercolors non-soluble work best. Faber-Castell PITT pens are one of my favorites! I have reviewed them and other favorites of mine here: http://www.peonyandparakeet.com/what-art-supplies-do-i-need/
Jenny-I second your remarks. Lovely inspiration Paivi-I shall have lots of fun having a go!
Thank you, Liz!
Beautiful and inspiring! I love the bright colors – right up my alley.
Thank you, Megan!
That was so amazing! And you totally made me feel like I could do it even though I’ve never done anything close!
Dana, thanks! Give it a go!
I love your work so much and am thrilled that you are now doing art full-time….that’s a plus for everyone!!
Thanks, Peggy! I am thrilled too!
Thank you Paivi! I posted my art journal page inspired by this post. Posting to Flickr was almost as daunting as letting go and doing the page! Haha. I had already bought a journal and done a few pages, so this was a nudge in the right direction! You are appreciated!!
Your page is absolutely gorgeous! I link it here so that everybody can see it! Thank you so much for sharing!
https://www.flickr.com/photos/126864615@N02/14998578279/in/pool-peonyandparakeet
Lovely to see someone else work stage by stage – I photograph mine at different stages too. Great page!
Thanks, Rosie!
I loved see your page grow creatively and the process you used. I have done artistic journaling by dropping color and letting the movement of the watercolors lead me to inspiration. Doodling on top of the colors, adding my journal entry to the colors, still amazes and inspires me, no matter where it leads me!
Anne, thanks! What a great idea to just let colors drop and let them lead you!
Thank-you Paivi. This is just what I need right now. I have been searching your site to find the instructions for hand decorated papers. Now I feel inspired to get started making my own!
Thanks, Linda! Great to hear that you start making your own papers! I have a lots of plans around handdecorated papers, so stay tuned!
LOVE your steps. I will copy them into the front a one of my blank journals and use your instructions to complete the pages. This sounds like fun and I can’t wait to see your new video. WOW! Thanks for sharing.
Mary, thanks! The video continues the theme of intuitive drawing, just published it: http://www.peonyandparakeet.com/video-blog-post-free-doodling/
Thanks a lot for this great step by step and all the tips you share with us.I love how you explain so clearly your creative process and how you feel at the different stages of your page.Best regards.
Thanks, Jeanne-Sylvie! For me creating art is more about the process than the result. I want to become better and better in understanding the process to help others too!
Just lovely! It was so helpful to watch you start the page even though you weren’t inspired right away. Thank you.
Meg, thanks! The start here was terrible but in the end, it was one key element of the whole drawing.
Thanks for the great post! I appreciate the step-by-step process…very inspiring!
Thank you, Susan!
Thanks for walking us through your process step by step. This was EXTREMELY helpful! I have spent a ton of time online taking courses & watching videos and I still can’t seem to start art journaling because I get overwhelmed & just dont know how to start a page. Your step by step tutorial is wonderful because you provided simple steps to follow that leave room for everyone’s personal style. I would love to see more step by step process tutorials and I cant wait to see a video from you. Thanks again for sharing your talent.
Erin, how great to hear that the post helped you! I think that concepts or methods like this are some kind of games. When you play them, you’ll get different result every time. They can make creating so much fun!
I also feel that the essence of art is to create something unique, not just copy. I do acknowledge that copying can be helpful but personally, I have never felt motivated of copying. That’s why I try to find ways and techniques that are adaptable for all kinds of styles.
love this page! Thank you for your little lesson here. Great inspiration, oh and also, love the last picture with your lovely little dog snoozing in the background 🙂
Thanks again for sharing
Sue
Victoria BC Canada
Thanks, Sue! Stella, my beagle, is such a pampered pet!