Some Things Never Change


Creating Wood by Doodling Layers
My husband is into woodworking, and he often shows me stuff that inspires me too. Like this box! After seeing it, I wanted to work with papers like they were wood. Carve with my pen and all!
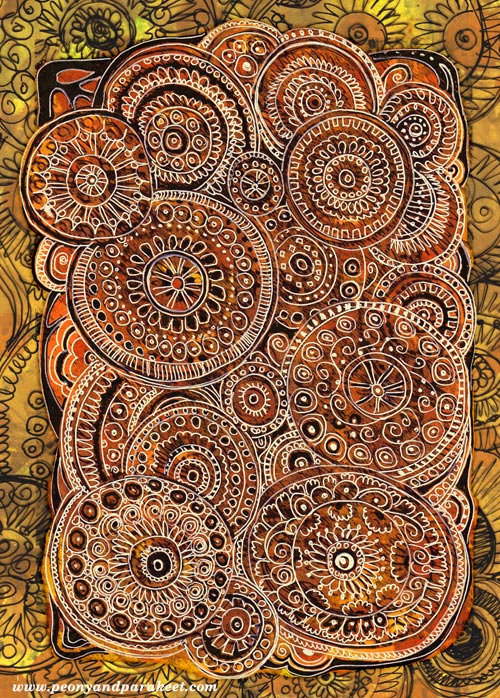
Here’s my little piece of wood, only on paper!
Doodling on a Transparency
First, I only had an idea of how wood is constructed. It has lots of layers. I made the bottom layer with inks and chose deep orange shades. Then I took one of my illustrations, converted it black and white with a computer and printed it to a transparent film. It was pretty full of everything – as my work usually is – even in black and white, but of course it was not quite enough. I added some more doodling on it with a black marker. It already began to look like wood when setting the transparency over the orange background.
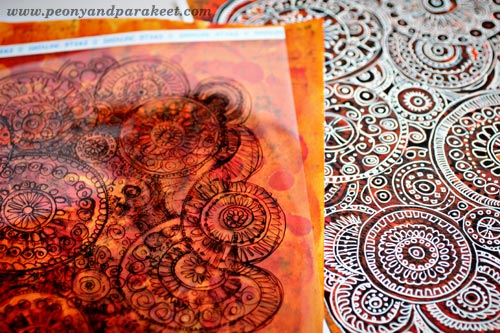
Doodling on a Print
I was not finished, though. The two layers were then scanned and manipulated digitally to make the black look like it’s gone deeper into the orange layer. The result was printed on paper. I added “the carving” using a white gel pen. Then back to the computer! I cut the piece in Photoshop and added the original scan as a background. Some fine tuning and there it was!
Doodling Layers – Creating Your Own Visual World
An American artist Georgia O’Keeffe said: “To create one’s own world, in any of the arts, takes courage.” I do not know about courage, but it surely is the best art can give to me: to create my own world. By process-oriented approach like by doodling layers, it’s both easy and fun!
Subscribe to my weekly emails – Get a free mini-course!
Some Publicity!
Faberge Revisited
Now is the time to grab those handmade patterned papers and make your own Faberge eggs! I used the smallest scraps here!

I began with a polystyrene egg and covered it with gesso. After the gesso had dried I glued the paper scraps with matte medium. Then I drew few extra doodles on it and added some faux jewels.
The stand is made from used tealight candle tin. I covered it with paper and added a decorated ribbon on it.

You can’t have too many details here! The more the better!

Have a creative Easter!
Move forward from crafts to art: Get a Free Mini-Course “Loosen up!”