From Movie Posters to Art Journal Pages
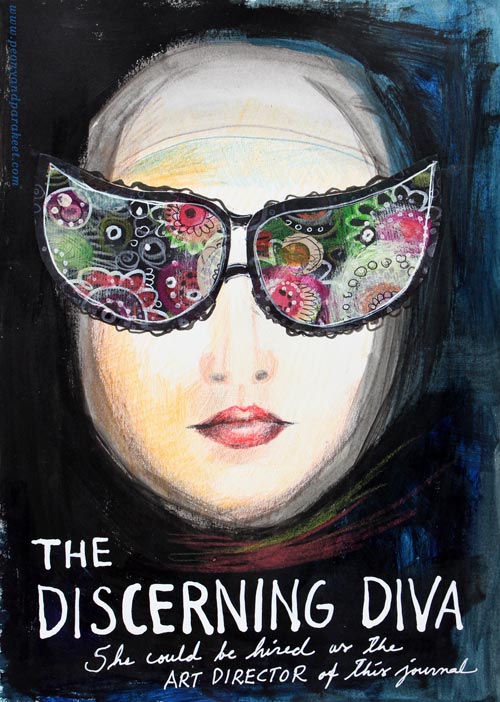
“The Discerning Diva – She could be hired as the art director of this journal.”
This page is my version of the poster for the movie “The Big Lebowski”. I have borrowed the concept of weird glasses and the composition from the poster, but it is still a separate artwork, not an exact copy.
The Discovery of Movie Posters
After learning that I like to use alphabet stamps in the art journal pages, I had been thinking about the next step in journaling. Last week I watched the poster artist James Victore‘s course Bold & Fearless Poster Design on Creative Live. His style has very little to do with mine, but I became fascinated by the visual concept of posters.
Last weekend I found a book about 1990’s movie posters at the local library. I became fascinated by the compositions used in the posters. Then it hit me: maybe I could replace the main elements with my own and apply the visual concept of the poster to my personal stories!
How to pick ideas from movie posters?
I will show you how to make your own “Discerning Diva” (very easy) but before that, I want to show you another poster-inspired page.

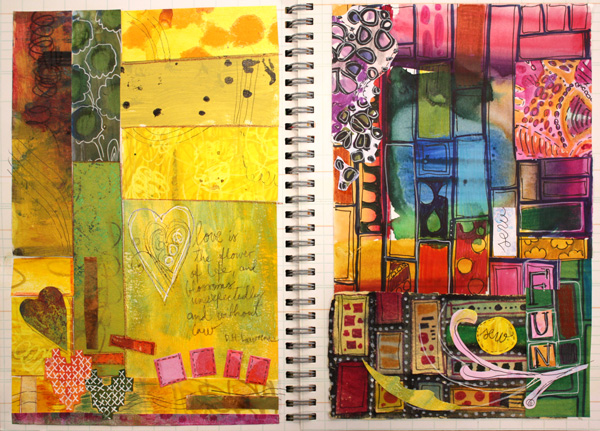
The page on the left is inspired by the poster for the movie “The Matrix”. I picked few main elements and the general atmosphere from the poster. The page on the right is made a long time ago, but I like how the two pages tell the story about being inside someone’s brain.
Four tips for picking ideas from the movie posters:
1) Composition: Examine the placement of the title, the grouping of the main elements and the most noticeable color contrasts.
2) Subject: Think about how your life could be applied to the movie.
3) Process: Examine the poster carefully but when you start creating, focus on your page and make it your own.
4) Imagine: Remember that you can replace the elements of the poster with whatever you like. For example, a person can be replaced with a vase of flowers.
Create Your Discerning Diva!
1) Paint the background of the page.
I used acrylic paints to make the background strong and heavy-looking. Leave an unpainted area for the face. Add water to the paint and gently brush the area around the face. Wet strokes create the impression of a thin scarf and add dimension.

2) Color the face.
I used colored pencils to maintain the big contrast between the background and the face. Add some color to the skin. Draw a mouth and a nose.

3) Add glasses.
Go to your box of hand drawn papers. Cut two lenses. Attach with glue or gel medium. Add frames with pens. Make the glasses as decorative as you like!

4) Add text.
Pick a color that has a high contrast with the background and journal on the bottom of the page. I have used a correction pen for the title and a white gel pen (Uni-Ball Signo) for the text below the title.

5) Add finishing strokes.
With colored pencils, add some strokes below the face to represent a scarf.
Add few strokes to outline the scarf near the forehead.
More Ideas for Compositions

Believe or not, this page is inspired by Austin Powers movie poster and hand embroidery! I think that hand embroidery has a lot in common with hand drawing.
Learn to draw from imagination and inspiration!
>> Buy Inspirational Drawing 2.0
How to Create More Often
For many years, I have been dreaming about constantly making quilts. I have even recorded that into my art journal. Even if I have quilted almost all my life, especially in the recent years, I have had difficulties to arrange time for it. It has always seemed to require so big block of time that I am able to arrange that only few times in a year.
I am especially fond of modern quilting. One of my favorite quilting blogs is Crazy Mom Quilts by Amanda Jean Nyberg. She is especially focused on quilting from fabric scraps. I also love her book Sunday Morning Quilts. There are so many days that I have browsed the book, admired my fabric stash and felt sorry for myself not to have enough time for the actual making.
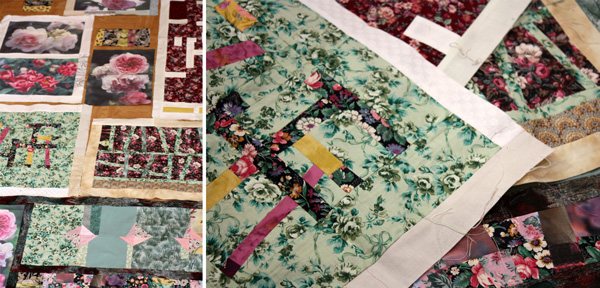
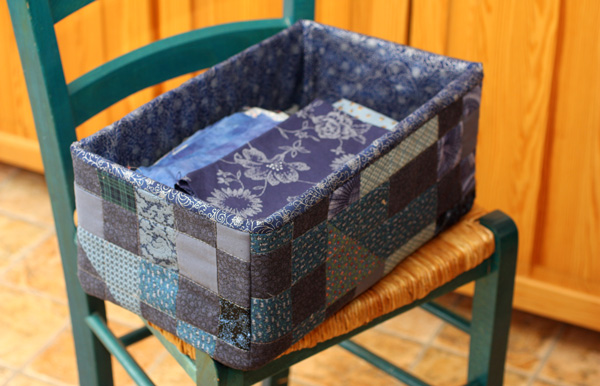
I don’t like showing unfinished projects, but as a proof, here’s one of the many patchwork projects which has been untouched for months. And, my dream is to make more of these quilted boxes for the fabrics (the pattern is from the book Sunday Morning Quilts)
The problem: How to create more often?
I have asked so many times:
– How to quilt more often?
and answered to myself:
– Arrange more time.
– Buy more fabrics, books, classes or subscribe to a magazine.
– Follow more blogs, have a Pinterest board for inspirational quilts.
– Organize your scraps first.
– Take more/less time for planning … etc.
None of that worked. But now have found the solution! I have developed a method derived from digital scrapbooking, another hobby of mine.
A Case Study: Scrapbooking as a regular practice
I had a similar kind of problem with digital scrapbooking, just not so bad. I wanted to do more of that but often realized that I had not done anything for a long time. Last October I decided to start scrapbooking one page a week with Project Life style: insert photos to a grid and make it simple. I only included one photo of each day or two, so it was not a big task to fill the page during the week. I decided that one page per week would be my minimum dosage. If I wanted to do more digital scrapbooking and be more creative, I could create more pages if I had any energy left.
What happened? I have not only created those weekly pages but 12 other layouts as well. That’s 33 pages total in 3 months which much more than my usual pace! Surprised by the result, I began to think about the magic behind that. And – could it be use for quilting as well?
Here’s is what I discovered.
1) Lack of time is not an issue, moving from one task to another is.
It did not require much time to take a sewing machine and start sewing. The reason I needed bigger and bigger time blocks to begin, was because I was thinking about too big tasks that seemed overwhelming. In other words, I required too much of myself. After working late in the evening, I should have started sewing a big quilt in a snap! The more I thought about starting, the less time I had to actually to do that and the less inspiring it sounded. When moving from one very different task, like writing, to another, like quilting, is not easy for the brain.
2) Lack of energy is not an issue, if the task is small and interesting enough.
It’s amazing how tired we can feel ourselves, but still spend time browsing computer or watching tv instead of going to sleep! There must be some energy left in us! I got that energy in use by telling myself that I was allowed to make only one little task. That way I did not imagine doing a lot and feeling a lack of energy for that. It also helped if I had some freedom to perform it. Then it sounded not only manageable but also interesting.
3) When the task is done, move to working with bigger projects.
The biggest thing that I learned is that I should always keep the promises for myself. If I presented a little task to get myself going, I should never ever make the task considerably bigger. Why? Because the next day I remember that one small task is actually a huge one and I don’t want to start it anymore. After I have made the small task and if I feel like doing some more, I can move to the bigger projects – to those unfinished ones that I actually want to finish!
Here’s how I adapted all that for quilting:
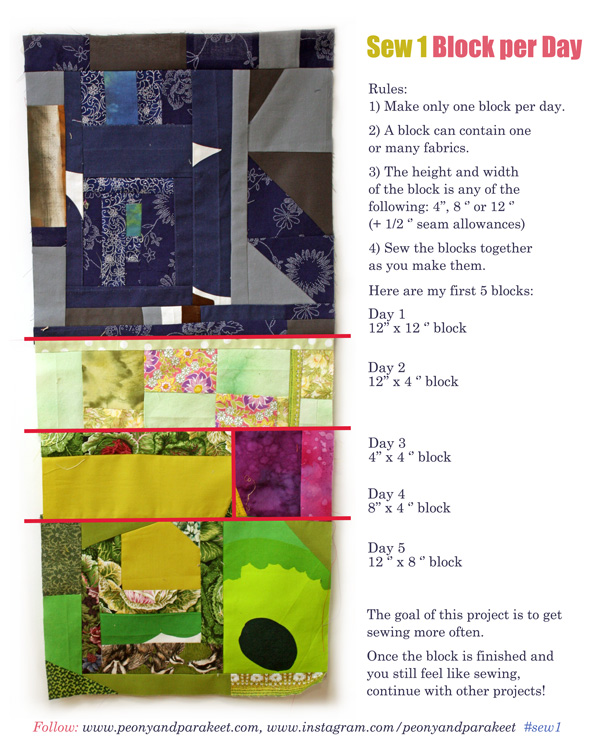
Sew One Block per Day
I decided to start a new quilt. But instead of planning and measuring, I just set few simple rules for each block. If I feel exhausted I can only pick one fabric, cut one 4-inch square and call it the block of the day. At the most I can make one 12 ” square with as much piecing as I feel like. But that’s it – no other blocks are allowed on the same day.
I started the quilt on the 1st January and here’s what I have made so far. This won’t most probably be my greatest quilt but more importantly, I have started to make a quilted box, a red one for the red fabrics. And – it is so much fun to sew it!
As the result of the new project, my studio has turned into the sewing room!
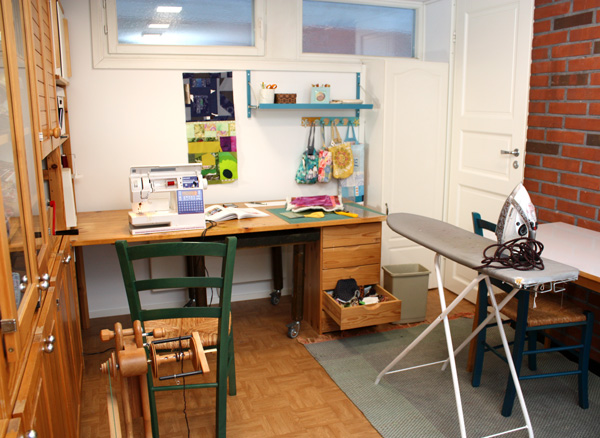
The little project bags are also handsewn (two of them are made just recently!). The old cardboard box is for buttons and been inherited from my husband’s grandmother.
Now you might ask:
How to apply this to art journaling?
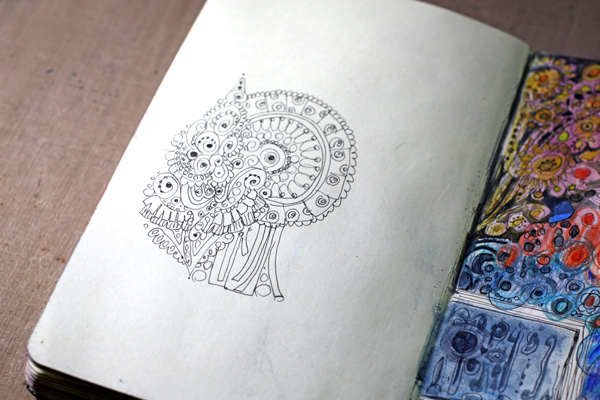
Why not make a page in phases from element after another! Here’s what I have made in two days: two little ornaments. I continue adding one doodled element or text each day. When the page is full, I will start coloring the elements, each at the time.
Preorder my class: Artistic Embroidery with Pens and Paper
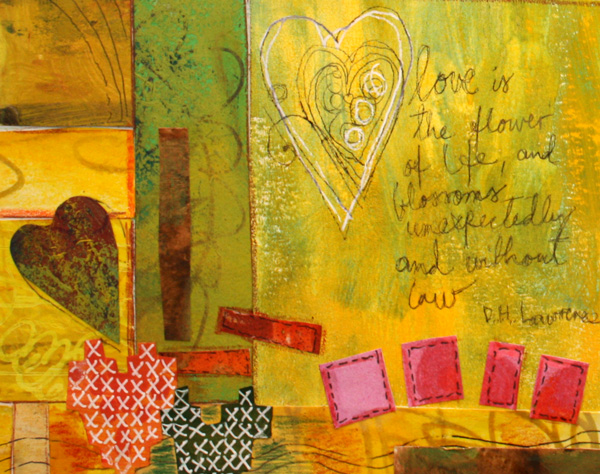
D.H Lawrence has said: “Love is the flower of life, and blossoms unexpectedly and without law.” You can replace the word “love” with the word “creativity”! But whether love or creativity, I believe that we need to do a little push to make the blossoming really happen. Like one doodle per day!
If you love crafting, quilting and needlework and want to show it in your art journal too, preorder my class from 21 Secrets Spring 2015 art journaling workshop! Let’s add little treasures to our pages! (Here’s also a recent blog post about the class).
Scrap Wood Collage

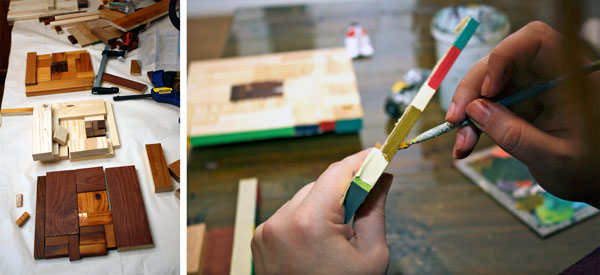
After working day and night with Folk Bag Workbook, it was time to relax. But honestly, I am not very good at doing nothing, so I decided to put my mind in rest by finishing the scrap wood collage. It is a project I have been making with my husband. I talked about the project first time in one of the video blog posts.
Background of the Project
While renovating the studio, we ran out of the ceiling panels. (You can see the hole in the ceiling on the video.) My husband had a box of wooden pieces collected from the past woodworking projects. We decided to use them to create an artwork together.
We had been talking about a project like this for a long time. My husband is an avid woodworker and I love to draw and paint. We are both extremely interested in art and design, so we thought this would be the perfect project for combining our strengths.
Planning
When the project started I drew some sketches and we discussed about them. I focused on the concept of how the wooden pieces should be arranged. I knew I wanted to include paint too, but was not too concerned about it yet. We agreed to create a sort of log cabin quilt type design and organize the wooden pieces by color. My husband drew the size of the artwork on the big piece of paper so that we could understand the proportions more accurately.
Making the Blocks
When we began to make the blocks, it dawned on us that I was too impatient to glue and adjust the pieces. And my husband had not much ideas about how the pieces should be composed visually. So I designed each of the block by organizing the wooden pieces on the table and my husband glued and finished the blocks. As every block is unique and most of the small wooden pieces are different sizes, my husband had a lot of work!
When all the blocks were glued, I wanted to add paint on them. I did not want to cover the wooden surfaces but add some color to the edges. As the theme of the studio is 1960s, I mixed colors from that era and painted each of the edges in different color.
Attaching the Blocks
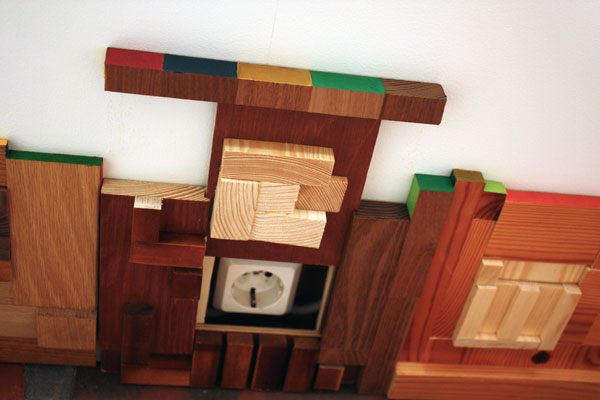
After the blocks were painted, the artwork was ready to be put in place. My husband had made a wooden panel where he glued each of the blocks.

A Special Feature
If you watched the video carefully, you might have noticed that there is a power plug on the ceiling. The artwork is designed so that there is a flap in one of the blocks that can be slided away!
Lessons Learned?
All in all, this was a great project! This is what I learned here:
1) Let the creativity correct the mistakes.
We could have just ordered few more ceiling panels but we did the exact opposite!
2) Make it meaningful.
Many of the scraps carry memories themselves. And we created more memories by working together.
3) Search for new territories.
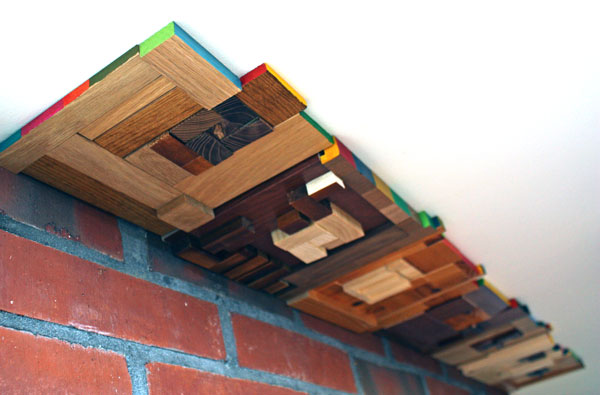
My approach for wood was totally different from traditional woodworker’s. The artwork was designed like a modern quilt even if it has been made from wood. For me, various wood species represented various colors. The wood grains were combined so that they formed rhytmic lines and ornaments. I also wanted to create a texture, but not by carving like a woodworker had done, but by playing with the height differences of each piece.
The fourth lesson is:
4) It’s good when it looks like it’s alive.
The end result might look terrible if you look at it like a traditional woodworker. While we made the project, my husband had some problems to get over the fact that every wooden piece does not fit exactly and there will be so much variety on the artwork. But in the end it all looks alive. I love the uneven, colorful edge. Combined with the texture, it all looks very organic even if there are clear, graphic blocks.
While creating this, I began to think of wood as a new art supply. Then I realized that most of the things in the world can be seen as an art supply! Mind-blowing, isn’t it!
P.S. Soon after we finished our artwork, my husband saw a woodworking video about making a wall-decoration from scrap wood. Does it differ from ours? Leave a comment and tell what do you think!
How to Make Folk Bags
Since 2008, I have had a dream: teaching how to design and make folk bags. When I invented the idea of the folk bag, I drew a sketch. That sketch was the first piece in the pile of documentation gathered for the workbook.
The workbook has 40 pages and about 100 images. You will be guided from the planning to the making of unique folk bags which you can keep, give away or sell.

I feel so happy and relieved at the moment!
The book includes instructions for three folk bags: one small with stripes, another large with solid-colored fabrics and third medium with printed fabrics. But the best thing in the workbook is that it guides you how to create unique bags in various sizes. Starting from choosing the theme and fabric and ending with setting the final decorations in place!

Buy the book for 15 euros (about 18.50 USD) here or from my Ravelry store