Freedom and Fear of Drawing – with Students of Peony and Parakeet
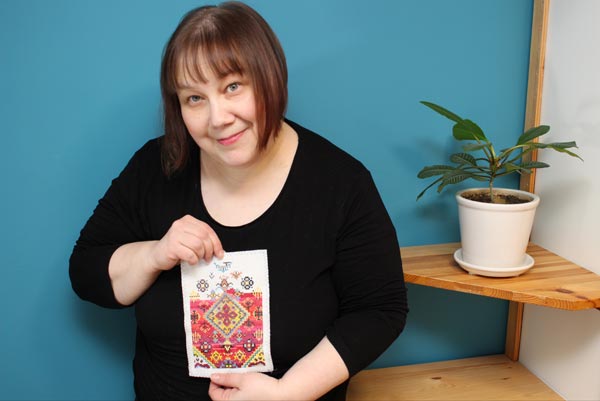
I dedicate this blog post for drawing, but I want to talk about cross stitching first. It’s one of my long-time hobbies, and I find it relaxing. I don’t have to make any decisions, use any imagination, just follow the chart, and the result will be just like I wanted it to be. Cross stitching is like a simple house plant. If you give a little bit of time for it fairly regularly, it will grow even if it doesn’t feel like so at first.
I can choose complicated charts or simple ones, and easily adjust the attention required for stitching. But there’s one problem that always remains: pixelation. Each image is made from single square-shaped stitches. No matter how complicated the design is or thick the fabric is, the pixelation is there.

Working with single stitches is not only a visual problem. It’s also a problem if we want to create more freely. Then we need a medium that allows faster and more flexible thinking. Like drawing. There are many kinds of drawing styles. When I want to experience creative freedom, I don’t do sketching using a pre-made model. (The photo shows a recent Renaissance-style painting in progress. I have designed it first in Photoshop.)

A Fear for Freedom – A Fear of Drawing
When I want to feel free, I don’t want models. Then it’s just a blank paper and a pen and a wish for a glimpse of imagination.
But freedom and fear are strangely connected. About three years ago, when I planned to leave my day job and start an art business, I warned myself. I told how I would no longer be anyone noticeable. I would have no office, no place to go every day, no colleagues to discuss with, no job title, no respect from others, no self-esteem. I would live in the darkest edge of the society and completely against the way of life I was taught. With these stories, I tried to prevent myself making the life change, and at the same time, I knew I had to try it. I had to turn the page and start a completely blank one.
I often connect with the same fear when I start drawing. That I am no one, that I have no power, that it is overwhelming and I don’t know what to do. But then, it’s the same gate that leads to the most wonderful feeling: the feeling of freedom.
Before I left my day job, I started to follow other self-employed women online. I listened to podcasts where they told their stories, and they all had one thing in common. They had put what they already know into use and then learned more. It made me list all the skills that I had and be more content about the decision I had made.
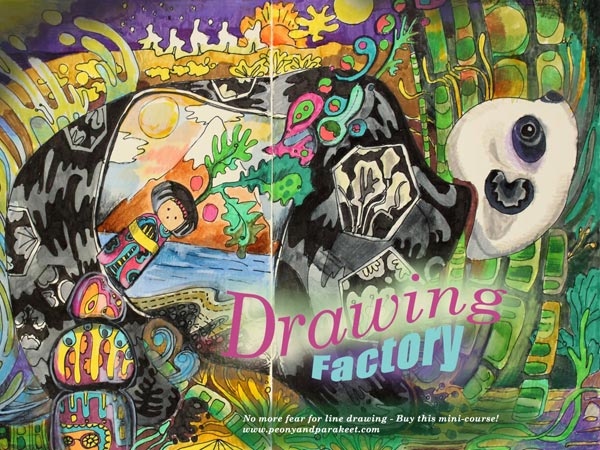
Drawing Factory Teaches You to Draw from Stick Figures
Still, on this day, I find it both assuring and inspiring to acknowledge what is already there before starting something new. So last year, I wanted to create a mini-course about line drawing, using the same philosophy. That was how Drawing Factory was born. It teaches you to start from stick figures and then move on to flowing lines and more imaginative illustrations.
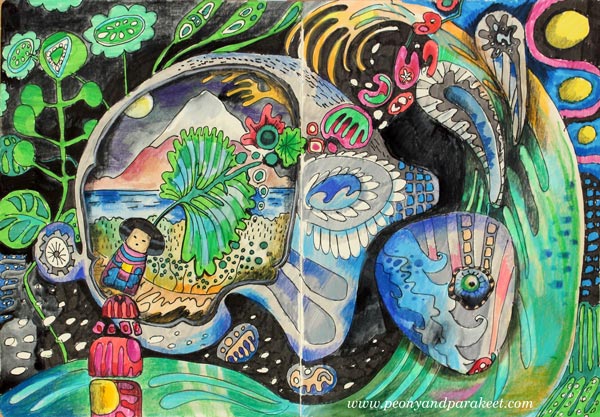
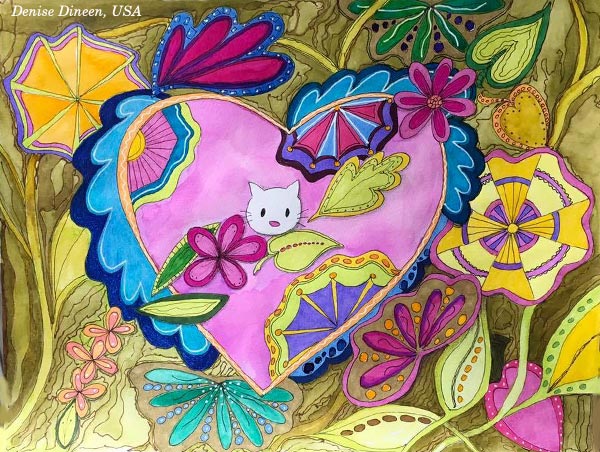
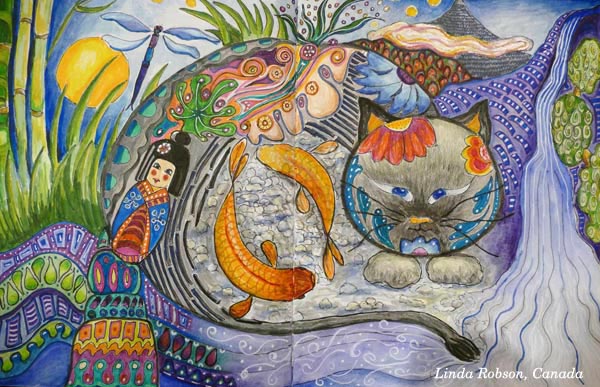
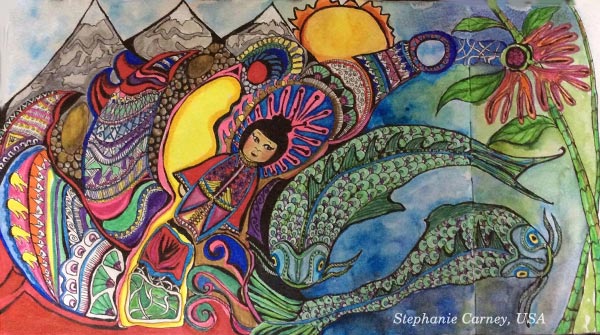
Student Artwork
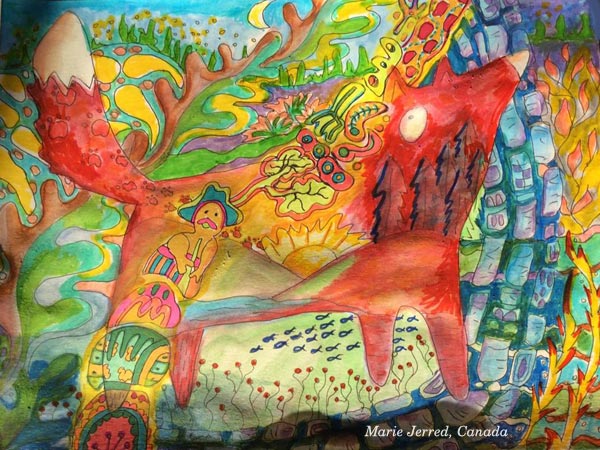
I offered Drawing Factory as a part of Imagine Monthly Fall 2016, the series of monthly mini-courses. See some of the gorgeous pieces that my students have made of the course! Another central theme in the course is Japan, the land of pretty details and high productivity and that has inspired Denise Dineen, Linda Robson, Christie Juhasz, Stepanie Carney, Marie Jerred, and Kathy Gallant, too.


Overcome Your Fears for Line Drawing – Buy Drawing Factory!
Drawing Factory is now available as a single self-study class. >> Click here to buy!
You can also buy the whole bundle of five art journaling classes, published last year as Imagine Monthly Fall 2016.

Thank you for supporting my journey now and during the last three years!
Mixed Media Seascapes – 5 Tips for Expressive Art
Notice the new, useful categories for the blog posts, see the sidebar “Posts by Theme” or if you are in mobile, see the end of the page!
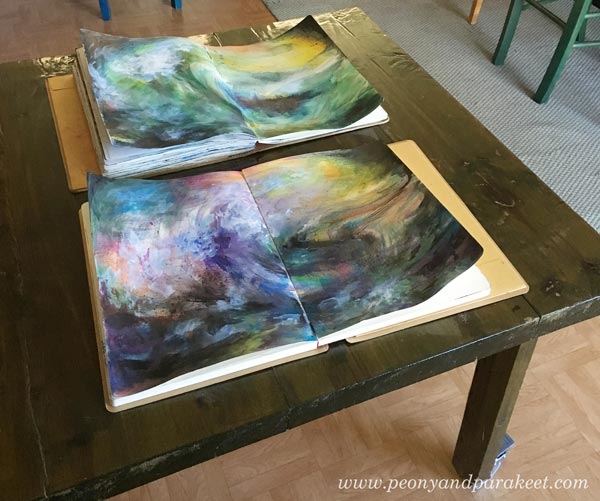
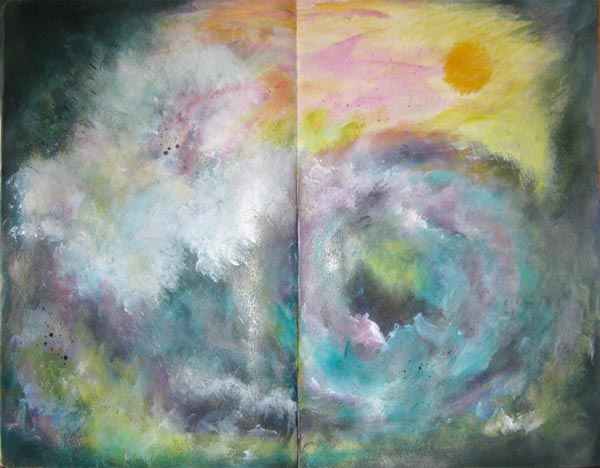
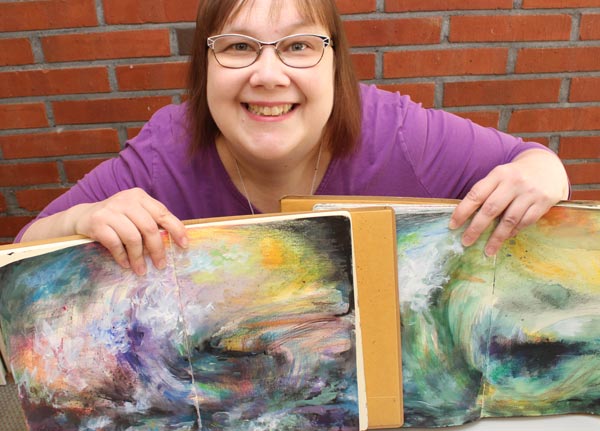
Sometimes I regret creating my art on the journals. When I created these mixed media seascapes for the mini-course Stormy Scenery, I wanted to keep the journals open and visible for days just to get back with the process and look at all the colors. And when I saw what my students had created, I secretly wished the same – that not so many weren’t in journals but frames. I want to share some art made from the mini-course and share some tips for expressive seascapes.
1) Play with Colors!
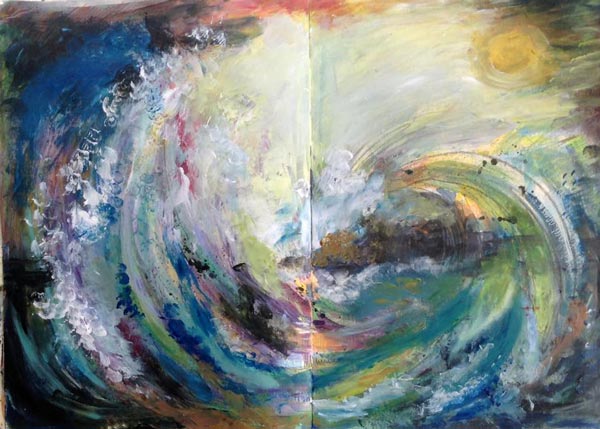
When creating the waves, show how the water reflects the colors of its surroundings. When there’s a storm, there will be a lot that’s moving, and it will affect the colors too. You can show your current state of mind as the sea and bring out the variety of thoughts and feelings. See how Claudia Watkins has made a row of waves with various colors.
2) Create a Connection Between The Sky and The Sea!
If the sea represents you and the sky represents the outside world, how do they interact? Susan Rajkumar has expressed the connection in a brilliant way. It looks like the sea is willing to hug the sun and the overall feeling of the piece is warm and happy.
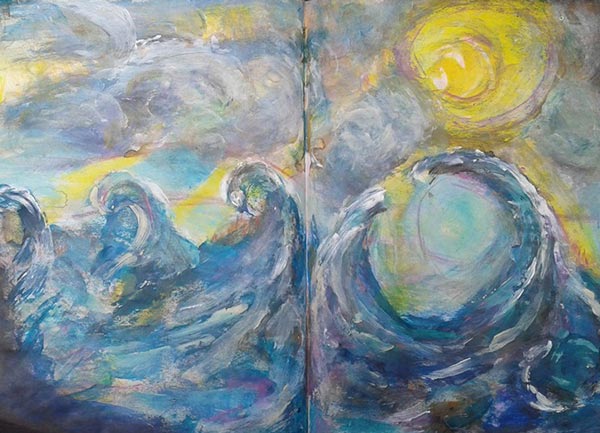
Sheila McGruer’s sun has left the sea, and it has caused an explosion of energy.
Sheila’s piece also has the softness which takes us to the next tip …
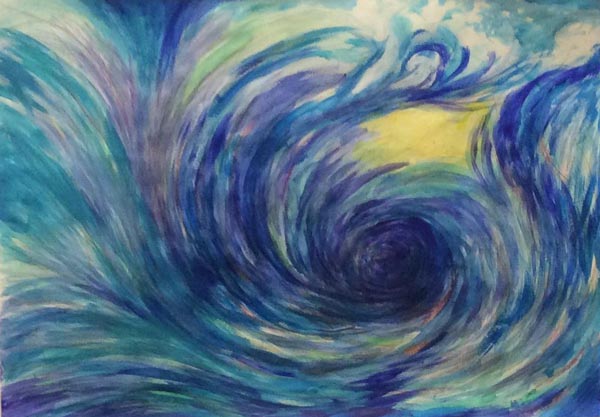
3) Express the Softness of Water
Cheryl Rayner shows the softness with both long strokes and splashes of water. With softness, you can practice gentleness towards yourself and others.

4) Show The Movement of The Waves
Enjoy the transformation that happens when you focus on creating art! Strokes and lines express the movement. Lorraine Cline’s green sea is captivating because it’s wonderfully dynamic!
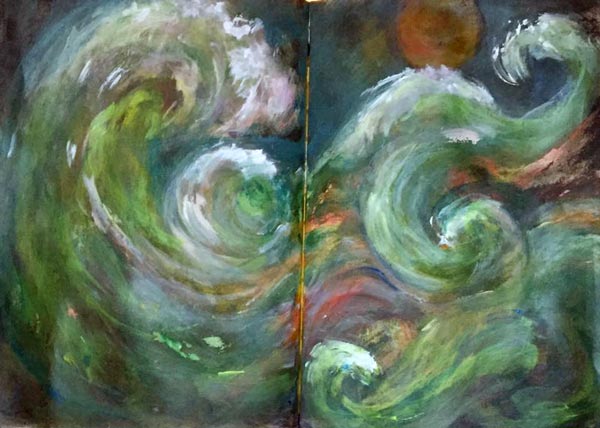
Terttu Laitinen has the great eye of the storm.
5) Make The Scene Look 3-Dimensional!
In any scene and any mind, some things are closer, and some things are further away. Add more 3-dimensional look to make some elements more blurry and some sharper than others. Satu Kontuvuori has a striking focal point where sharp white waves are on the top of the blurry black eye of the storm.
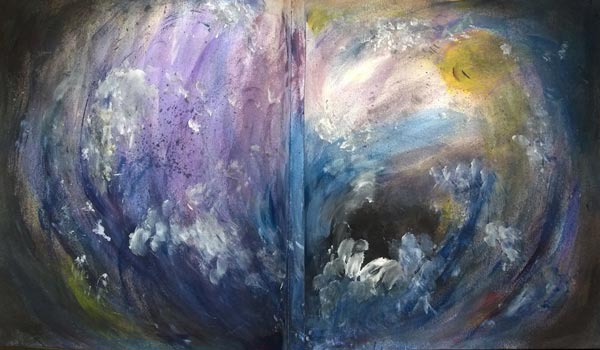
Mackie d’Arge also has a clear focal point and lots of less defined splashes around it.
Internal Seascapes – Connect with Your Internal Energy!
The mixed media seascapes shown in this blog posts are made from the mini-course Stormy Scenery which was part of my Imagine Monthly Spring series last year. You can now purchase it individually too. When creating Stormy Scenery, I was inspired by the long chain of seascape painters, especially by J.M.W. Turner and Ivan Aivazovski. I also have a Pinterest board called Internal Seascapes where I have collected inspirational sea paintings.
But in Stormy Scenery, more than just to paint the sea, I coach you through the process of opening up and bringing out your expression. With the mini-course, you are not so much mimicking the sea outside but expressing the power inside. I believe that every artist has a unique power as well as every day has a unique energy.
Create Mixed Media Seascapes!
Use colored pencils, watercolors, and acrylic paints to create expressive mixed media art!
>> Click here to buy Stormy Scenery!

Mixed Media Drawing Tutorial – Create Step by Step!
With this blog post, I want to encourage you to
… draw from imagination
… fall in love with the combination of water-soluble media and colored pencils
… find inspiration from art that has been created hundreds of years ago
Inspiration from Old Still Lives
A few weeks ago, I visited a small art museum called Sinebrychoff Art Museum in Helsinki. I have visited it many times because it’s a cozy old building and small art exhibitions are refreshing more than overwhelming. One more reason is that in Finland you can buy a museum card for about 65 EUR and it gives you free access to most of the Finnish museums for a year. It became available in 2015, and since then I have visited museums more than ever before in a year.
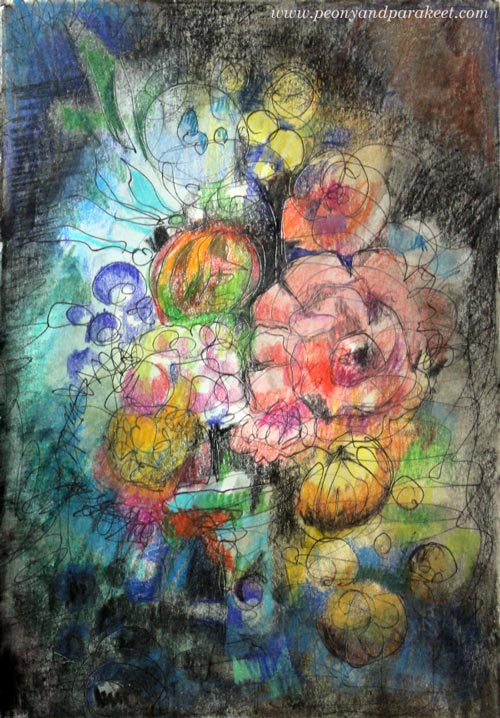
The exhibition at Sinebrychoff Art Museum was about old still lives, painted in the 16th to 18th centuries. I have admired those old, elegant paintings with beautiful flowers and fruits of all sorts for a long time. I have a Pinterest board dedicated to the most luxurious still lives, and I often bring up little things that I have learned from watching them in my classes. So no wonder, I was very inspired after seeing the exhibition, and I had to create a small drawing just to let my imagination play with the memories of beautiful paintings.
Mixed Media Drawing with Imaginative Fruits and Flowers
I picked one of my art journals, a Daler-Rowney’s Graduate Sketchbook, and a black thin-tipped drawing pen that has permanent ink. I prefer sketching with a permanent pen rather than with a pencil. Not being able to erase anything makes me more creative. Using permanent ink allows me to play with wet media as well.
First, I started doodling from the edges towards the center. Then I added some watercolors on the top of the doodling leaving the center blank.
Once the watercolor was dry, I added more doodling in the center and finished the page with colored pencils. The dark background makes the colorful flowers and fruit stand out.

This process was so simple that I wanted to make a small tutorial for another page inspired by old still lives. So here it comes!
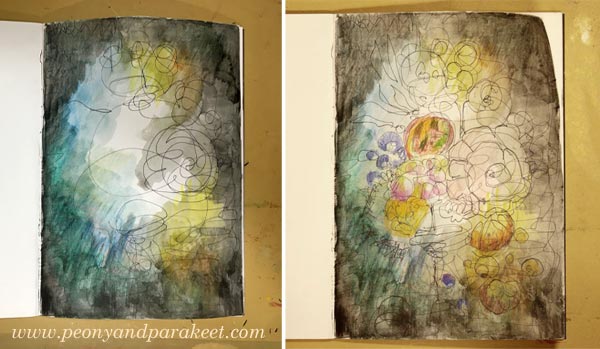
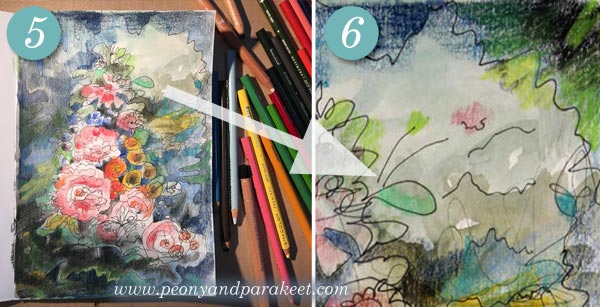
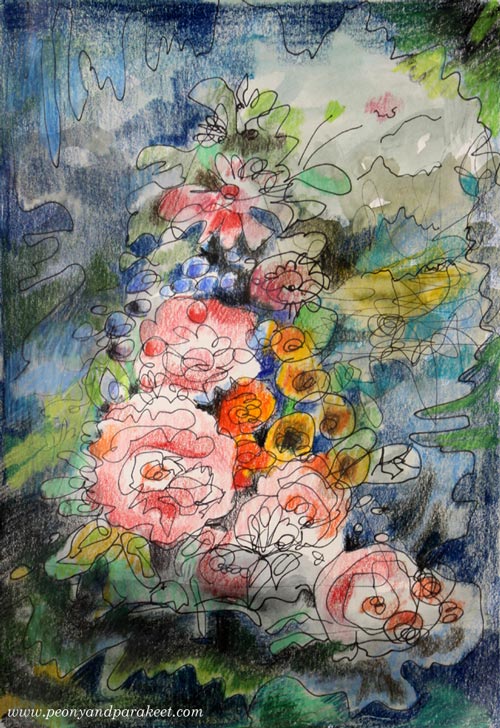
Mixed Media Drawing – A Tutorial
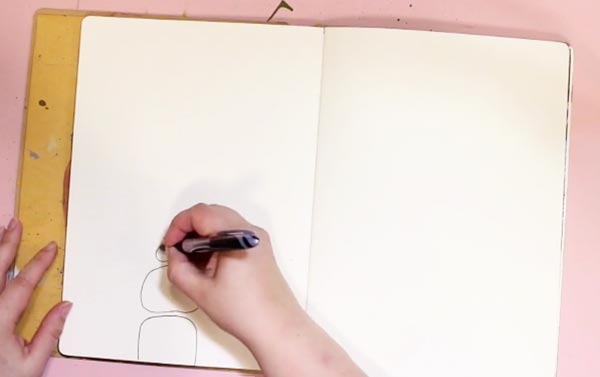
1) Set the composition with simple shapes. Draw a big shape and then a smaller one. The shapes can intersect.
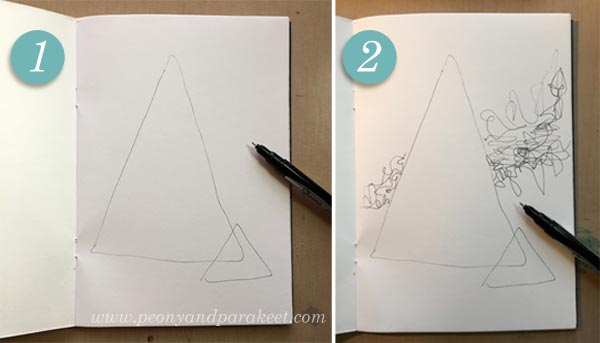
2) Add the horizon by doodling. I wanted to make the drawing dynamic by giving the horizon a diagonal direction.
3) Paint the background leaving most of the shapes blank. I used watercolors, but you can use any water-soluble media like inks or watercolor pens. Just make sure that your lines will show through because it’s part of the visual appeal. Use more than just one color so that your painting inspires you in the next step. Let dry.
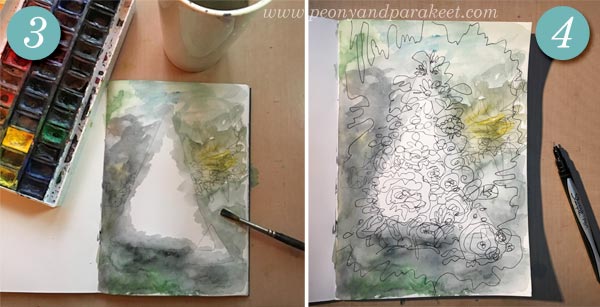
4) Doodle your heart out! Without raising your pen from the paper, doodle over the painted background and on the center too.
5) Color the drawing with bright colors and dark shadows. I used colored pencils, but you can use almost any media for coloring. For example, felt-tipped pens work great. You can also continue to use water-soluble media for coloring. Add dark colors between the flowers and the leaves. Leave some of the painting made in Step 3 visible so that your drawing breathes.
6) Add the final touches to balance the drawing. I added some lines to make the elements in the background more explanatory and a tiny flower that looks like it’s reaching them. I also made the top right corner look similar to the bottom right corner to highlight the diagonal composition in the background.
Mixed Media Drawing – Say You Want to Explore More!

1) Enjoy Drawing from Imagination!
At Inspirational Drawing 2.0, you will quickly get in touch with you living line and lively imagination. You will also get personal help to finish your pieces so that they are meaningful and appealing to other people too.
>> Sign up for Inspirational Drawing 2.0!

2) Practice Merging Painting with Drawing!
Learn to merge drawn areas with painted areas and play with shadows! Flowing Greenery is a self-study class with two projects, a small still life, and a bigger landscape.
>> Buy Flowing Greenery!

3) Get Creative with Colored Pencils!
Coloring doesn’t have to be stiff or boring. Learn to color freely whether it’s coloring a drawing or creating intuitive art directly on a blank page!
>> Buy Coloring Freely!
What Any Artist Can Learn from Old Masters
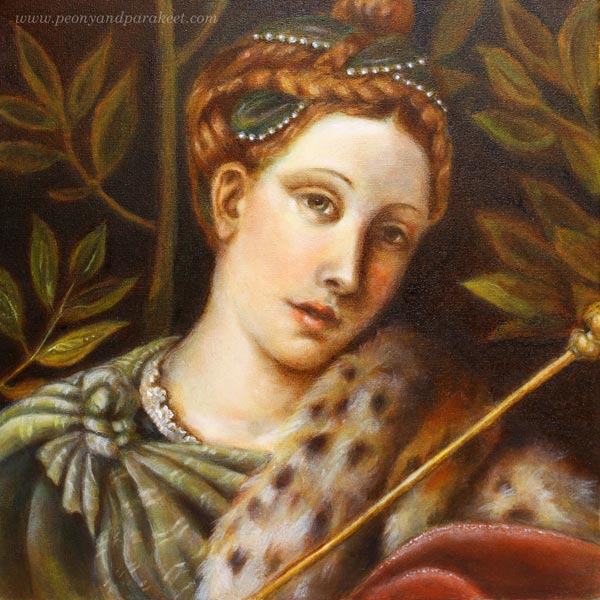
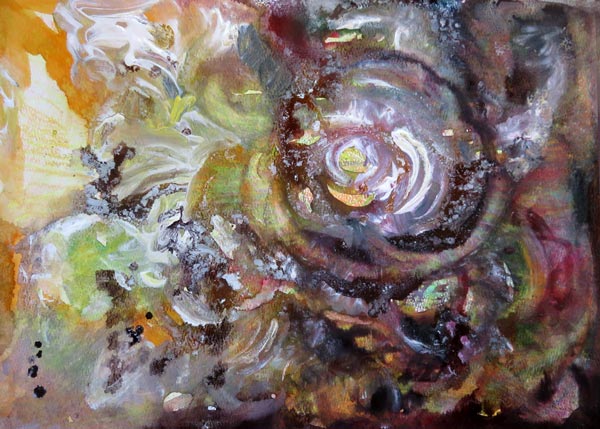
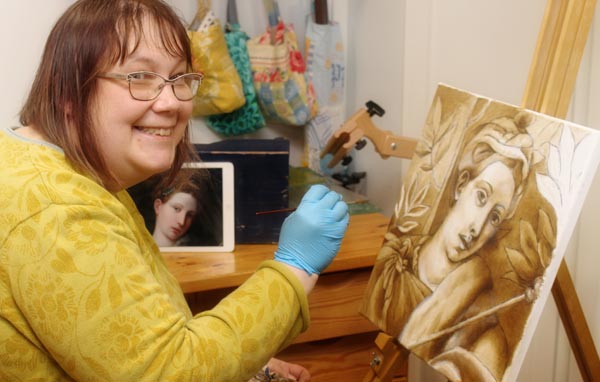
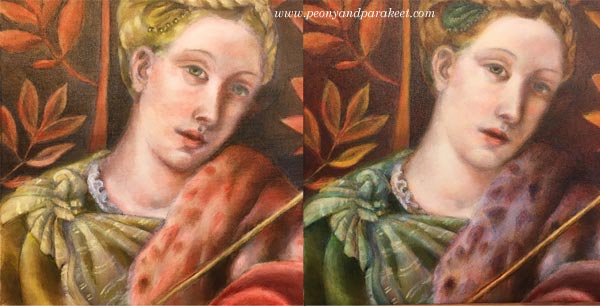
If you have followed me on Instagram or Facebook, you’ve already seen that I have had a special project in November. I have been painting a replica of an old painting and learning techniques that artists used already hundreds of years ago. These are called old master painting techniques. Famous old masters like Leonardo da Vinci and Johannes Vermeer used them when creating their masterpieces. My painting is a copy of a detail from Moretto da Brescia‘s painting “Portrait of a Lady as Salome.” I call mine “Dreaming Salome” because I gave her a more dreamy look and different meaning. The portrait was painted in the course organized by The National Museum of Finland. The teacher of the course was Emmi Mustonen.
5 Tips You Can Learn from Old Masters
After painting my first oil painting, and the first one that uses these techniques, I feel that there is still a lot to learn. So I will be painting another one with these techniques during the spring. However, I have already found out a lot of things that can be used with any supplies, and I wanted to write a blog post about what you can take from my experience. These tips can be applied to any themes, even to abstract art. At the end of this post, there’s also a short video (watch it on YouTube) that shows more images from the process.
1) Don’t Get Discouraged in The Beginning!
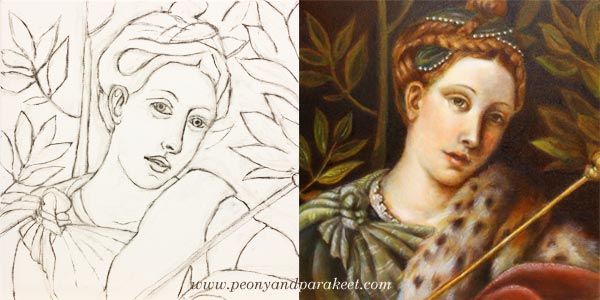
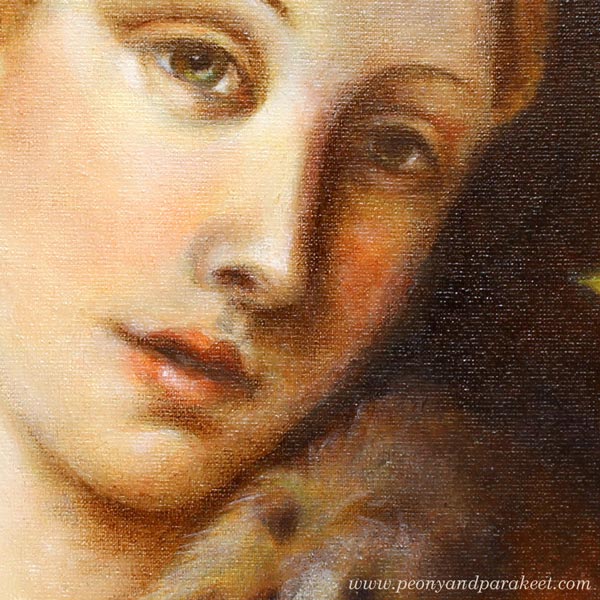
My process of making the painting started with a charcoal sketch. While sketching, I felt I was just making a big mess. I pressed too hard, and the drawing wasn’t detailed enough. The image shows the sketch once it was cleaned with an eraser – just before the first layer of paint. If you compare it with the finished painting, there’s a huge difference between the two. The expression of the lady looked sad in the drawing, but she has a half-smile in the finished version. I understood that the facial features and characteristics are so subtle that it takes a long time to get them right.
When sketching, I hadn’t the persistence to finish her hair and shawl, but still, I was able to make them quite detailed during the painting process. If I had made the original sketch without attending the course, I would have called it a failure and lost my hope of achieving something that would look like an old painting.
I often talk about raw ideas (see this blog post) and that applies to realistic art too. The first lines are just the beginning of understanding what the final work will be. When I was sketching, I only had a rough idea of how my lady should differ from the original version. But once I continued the painting process, my vision got clearer. So, stay curious about the insights that you will get during creating, and don’t get discouraged in the beginning!
2) Before Diving Deeper, Limit Your Supplies!
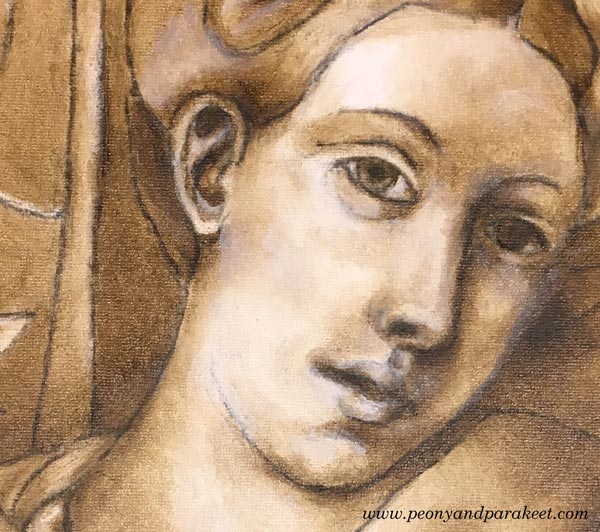
In my painting, the first layers were made with just two colors: burnt umber and zinc white. These first layers form a so-called underpainting that shows where the shadows and lighted areas are. It enforces the painter to look for contrasts, and on the other hand, it enables working with details without making color choices. The philosophy of underpainting can be applied to any media and style when it’s seen as a phase where you limit your supplies and add more content to the piece. When you go through every area in your work and make sure that it connects well with the next one, you will control the big picture through details. I find this much more enjoyable than trying to see everything at one glance all the time.
3) Slow Down to Maintain a Gentle Focus!
I was surprised by the positive feelings I went through while painting with old masters’ techniques. I thought that there would be a lot of demanding voices in my head, but the process surprised me. Even if I was stretched out from my comfort zone, I realized that there could be “a gentle focus,” where you put all your energy into work so that it improves your self-image too. I believe that this kind of new self-acceptance was based on two things.
First, I knew that it would take a long time to finish the painting. Six sessions in the classroom weren’t enough. I also had to do homework. Each of the layers had to dry before adding a new one, and drying took several days. This slow pace felt old fashioned but good too. It made me think how much gentler we would be in general if weren’t so busy all the time. I also noticed how I became less worried about mistakes. When the progress is slow, mistakes start small, and it’s easier to correct them.
The second thing that helped me was that we were using a finger to remove the brush strokes. When I gently caressed the canvas with paint, it affected my whole thinking. It felt like the beauty created and seen by Moretto da Brescia caressed my brain.
4) Don’t Try to Make Your Middle Look Like the End
Before attending the course, I made one decision: I would do my best to follow the teacher’s advice. Because I was not familiar with the techniques, I didn’t know beforehand how the painting should look after each layer. When I teach art, I often see people worry over details that will look gorgeous once they just move on to the next steps. It’s human to compare your middle to the desired end. But if you can set your criteria according to each phase, it will lead to better quality.
So, when laying the colors one by one, I tried to quench my worries about how yellow the dress looked or how red the fur was. When using old masters techniques, colors are not mixed on a palette. The pigments from the tubes are laid in thin layers as they are. So if you want green, you will start with yellow, let it dry for few days and then move on to blue. The transparent layers with soft edges result in mixed color and a realistic look.
When painting these thin layers of color, I couldn’t help thinking that the skin was too uneven. But my teacher advised me to continue creating color differences to get the painting ready for “a white wash.” A thin layer of zinc white made the skin more even, and all the previous layers made sense. Try this approach of seeing layers and elements as building blocks to new ones!
5) Sharpen The Soft, Not Vice Versa!
I was often reminded to make every area and detail softer. Even most of the tiny spots were softened with a finger to make them more translucent and blurry without sharp edges. As a result of that, the painting looked blurry and untidy. But when finishing, sparingly added sharp lines and dots did the trick. It felt magical how suddenly the whole painting looked accurate. I learned that it’s very easy to sharpen the softness. Adding few strokes finished the fur. Adding a tiny sharp dot finished the eye. The nose didn’t need sharpening at all because I wanted to bring the eye to the mouth where I added a small white spot.
When you add softness, you will also make your work look more dimensional. Leonardo da Vinci has said:
“The beginnings and ends of shadow lie between the light and darkness and may be infinitely diminished and infinitely increased. Shadow is the means by which bodies display their form. The forms of bodies could not be understood in detail but for shadow.”
After painting my “Dreaming Salome,” I have become fascinated by watching the edges of items and how soft they are. I know that today’s world is sharp. We aim for sharp photos, a clean graphic look, and turn on the fluorescent lighting. The things we use are industrially made and as perfect as they have been designed on a computer. But try visiting Leonardo’s softer world! Light a candle and observe the lights and shadows. Let everything soft inspire you when you are creating art and reflect that softness towards yourself too!
Bonus: Make it Meaningful – Watch the Video!
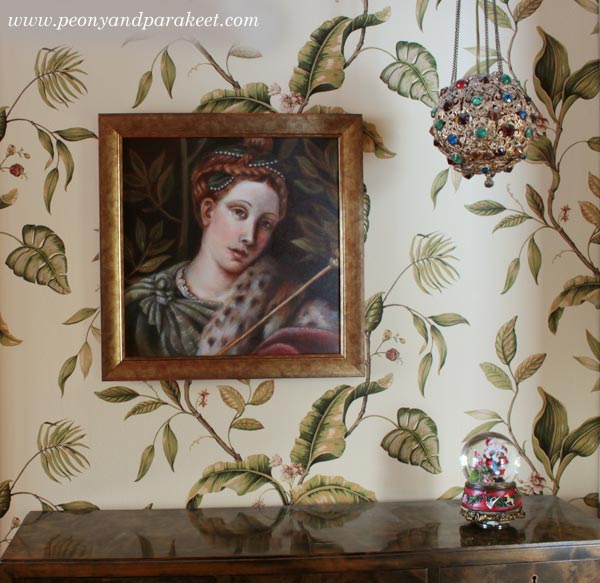
My “Dreaming Salome” is now framed and she has a special place in our library room. I was so happy to be able to finish her before Christmas.
This painting is my first exercise when learning from old masters, but it also has other symbolic meanings. I have made a short video showing the images from the class and how she was painted layer by layer. At the same time, I also explain what Dreaming Salome symbolizes to me.
Learn old masters’ techniques and more!
>> Sign up for Floral Fantasies!